*** LATE ENROLMENT CLOSES SATURDAY @ MIDNIGHT***
NEW 4 MONTH PAYMENT PLAN JUST ADDED
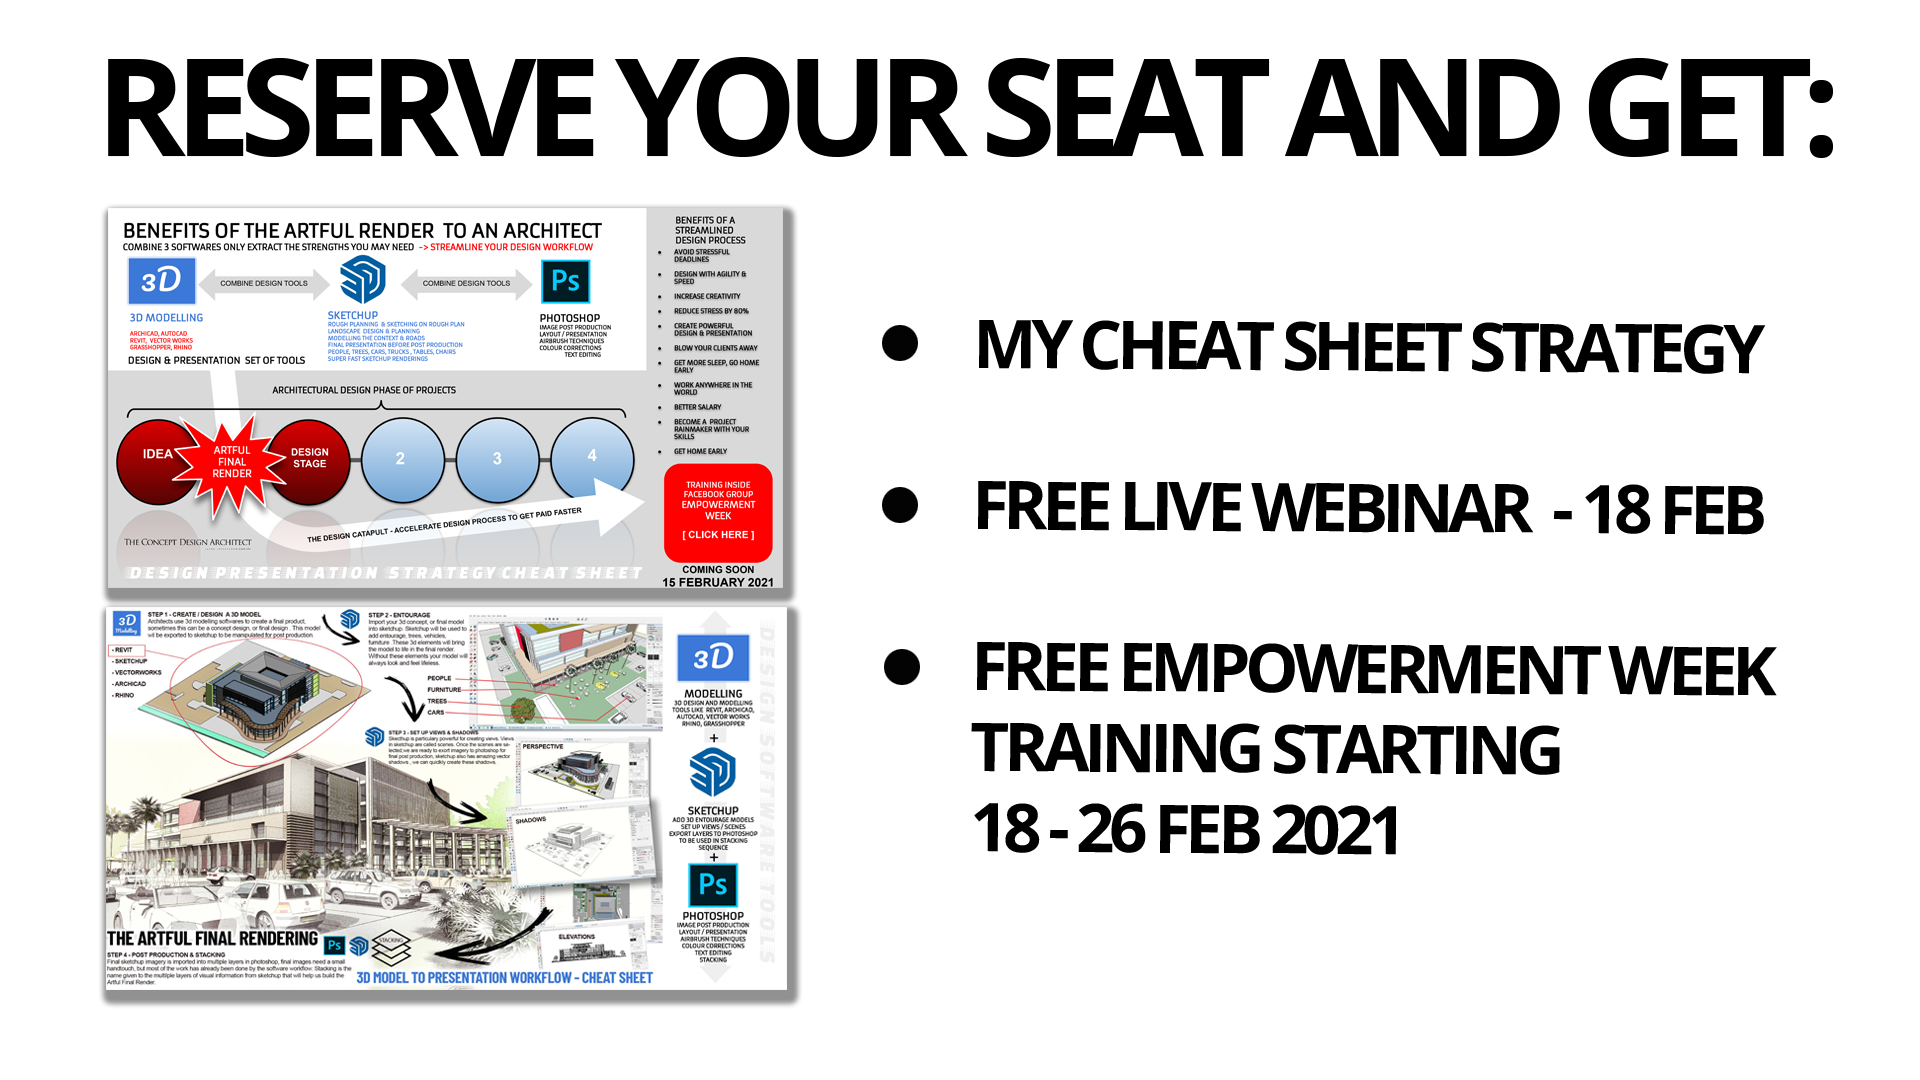
THE ARTFUL RENDER MASTERCLASS
A Comprehensive Training on the Artful Render Method Exterior & Internal Perspectives.
In 6 Weeks, You'll Learn Everything You Need to Implement This Technique In Your Practice!
Create artful almost hand-rendered sketch-like perspectives in a fraction of the time that photorealism takes, impress potential clients, create amazing perspectives faster, and win more projects.
* 7 Day Money Back Guarantee*
*Normal Product Price -> $2500.00*
REGISTRATION CLOSES ON SATURDAY MIDNIGHT NIGHT IN :
00
DAYS
00
HOURS
00
MINS
00
SECS
COURSE OUTLINE OVER 6 WEEKS
- REGISTRATION: 9 MAY - 13 MAY + JUMPSTART TO SKETCHUP
- THE FIRST MODULE WILL BE OPENED UP ON 16 MAY 2022
- MASTERCLASS TRAINING BEGINS ON TUESDAY 17 MAY (LIVE ZOOM)
- RECORDED MODULES RELEASED EVERY WEEK
- 6 X LIVE SESSIONS OF 1.5/hour ON ZOOM
- A NEW INTERIOR MODULE LIVE SESSION JUST ADDED
NB: All sessions will be recorded and available in the member's area
TRAINING EVERY TUESDAY :
New York, USA * 2pm
Los Angeles, USA * 11am
Miami, USA * 2pm
Rome, Italy * 8pm
Vancouver, Canada * 11am
Toronto, Canada * 2pm
London, United Kingdom * 7 pm
Amsterdam, Netherlands * 8pm
Singapore, Singapore Wed, * 3am
Sydney, Australia Wed, * 6am
Auckland, New Zealand Wed, * 8am
Melbourne, Australia Wed, * 6am
If you don't see your time click here
[ CLICK HERE ]
REGISTRATION WEEK- GETTING STARTED
1 - Getting Started - Introduction to setting up Community
2 - Setting up Photoshop & Sketchup
MODULE - 1 - JUMPSTART TO SKETCHUP
1 - JUMPSTART - SETTING UP MEASUREMENT SYSTEMS
2 - THE VIRTUAL WORKSPACE - XYZ CO-ORDINATES
3 - REAL LIFE - ONE TO ONE SCALE
4 - INTERFACE & TOOLBARS
5 - THE VIEWPORT - ZOOM, ROTATE & PAN
6 - ENTITIES AND TAGS (LAYERS IN SKETCHUP)
7 - THE MATERIALS MENU - PAINTING COLORS TEXTURES OPACITY
8 - COMPONENTS
9 - EDGE STYLE OPTIONS
10 - STYLES AND EDITING EDGE SETTINGS
11 - CASTING SHADOWS WITH EDGE SETTINGS ON
12 - CASTING SHADOWS WITHOUT EDGES
13 - THE LARGE TOOLSET - THE MAIN TOOLS
MODULE - 2 - SKETCHUP / MINI PROJECT
1 - EXPORTING MODELS FROM SOFTWARE INTO SKETCHUP
1.1 - EXPORTING MODELS FROM REVIT
2 - IMPORTING 3D LANDSCAPE FROM DIGITAL GLOBE
3 - CREATING 3D CONTOURS FOR PRESENTATIONS
4 - IMPORTING MODELS FROM 3D WAREHOUSE
5 - CREATING A GREEN SPACE WITH OFFSET TOOLS & FLAT PLANES
6 - THE DIFFERENCE BETWEEN COMPONENTS & GROUPS
7 - HOW TO CREATE COMPONENTS
8 - HOW TO CREATE THE MINI PROJECT - ARTFUL COFFEE SHOP
9 - INSTRUCTIONS - MINI PROJECT
MODULE - 3 - SETTING UP VIEWS FOR PHOTOSHOP & PRINT
1 - VIEWS / SCENES, DISTORTING PERSPECTIVE AND 2 POINT PERSPECTIVE
2 - EXPORT HIGH-RESOLUTION IMAGEs FOR PRINT & POST PRODUCTION
3 - THE STACKING EFFECT - POST-PRODUCTION IN PHOTOSHOP
MODULE - 4 - JUMPSTART TO PHOTOSHOP [ RENDERING TOOLBOX ]
1 - SETTING UP IMAGES & TEMPLATES IN PHOTOSHOP
2 - THE LARGE TOOLSET
3 - WORKING WITH LAYERS IN PHOTOSHOP
4 - LAYERS, TRANSPARENCY FILTERS & OPACITY
5 - TRANSFORMING IMAGES
6 - SETTING UP A3 TABLOID @ 150 DPI (RESOLUTION)
7 - DRAG AND DROP IMAGES
8 - CHOOSING & SETTING UP OF AN AIRBRUSH
9 - BRUSH VISUALIZATION AND TESTING
10 - ERASING WITH AN AIRBRUSH EFFECT
11 - ADJUSTING BRIGHTNESS CONTRAST
12 - SATURATION & DESATURATION TECHNIQUES
13 - CLONE STAMP TOOL
14 - DELETING WITH THE LASOO TOOL
15 - BURN & DODGE TOOLS
MODULE - 5 - COFFEE SHOP - RENDER 1
2 - SETTING UP SHADOWS IN SKETCHUP TO RENDER IN PHOTOSHOP
3 - ASSEMBLING SHADOWS IN LAYERS
4 - ADDING COLOUR BACKGROUND
5 - ADDING LINES & EDGE SETTINGS
6 - COLOR TOUCH-UPS - DODGE AND BURN TOOL
7 - GRAPHIC PEN FILTER
MODULE - 6 - COFFE SHOP - RENDER 2
1 - ARTFUL RENDERING 2 - SKETCHUP
2 - ARTFUL RENDERING 2 - SOFTENING IMAGERY WITH AIRBRUSH
3 - ARTFUL RENDERING 2 - BLUE SKIES
4 - ARTFUL RENDERING FINAL LAYOUT A3 (TABLOID) - COLLAGE
5 - [ LAYOUT ] QUICK RENDER INFILL IMAGERY
6 - [ LAYOUT ] FINAL COLLAGE MIXING STYLES
7 - [ LAYOUT ] COLLAGE, HOW TO ADD LABELS & PARAGRAPH TEXT
8 - [ LAYOUT ] SINGLE IMAGE PRESENTATIONS
9 - [ LAYOUT ] SINGLE IMAGE MIXED STYLES
10 - MINI PROJECT
11 - NB: READ THIS - MINI-PROJECT - DOWNLOAD FILES
MODULE - 7 - RESIDENTIAL - LAKE VIEW RETREAT - RENDER 1
1 - OPTIMIZING AN IMPORTED 3D MODEL
2 - GEO-LOCATING THE MODEL WITHiIN DIGITAL GLOBE
3 - WORKING WITH THE ENTOURAGE FILE LIBRARY
4 - EMBELLISHING THE MODEL WITH 2D & 3D ENTOURAGE
5 - CHOOSING SCENES AND EXPORTING TO PHOTOSHOP LAYERING / STACKING
6 - LAKE VIEW RETREAT - ARTFUL RENDER
7 - THE SEPIA EFFECT
8 - THE WHITE LINE EFFECT
MODULE - 8 - RESIDENTIAL - LAKE VIEW RETREAT - RENDERING 2 & 3
1 - EXPORTING ELEVATIONAL IMAGES FROM SKETCHUP TO PHOTOSHOP
2 - STACKING ELEVATIONAL IMAGES IN PHOTOSHOP
3 - GRAPHIC PEN FILTER EFFECT
4 -FINAL ELEVATION WITH WHITE LINE EFFECT
5 - RENDER 3 - DARK LINE TECHNIQUE
MODULE - 9 - RESIDENTIAL - LAKEVIEW RETREAT
1 - Entrance Shadows Solar North_& Sketchup Exports to photoshop
2 - Entrance Render - Stacking layers in Photoshop
3 - Exporting quick infill imagery for Photoshop
4 - Infill Aerial View
5 - Infill Topography - Plan View
6 - Assembling Collage Layouts
7 - Collage Layouts - Training 2
8 - Collage Layouts - Training 3
MODULE - 10 - CONCEPT DESIGN CAMPUS - COMMERICAL SCHEME
1 - EXPORTING 3D DWG FROM REVIT & IMPORTING IT INTO SKETCHUP
2 - ADDING VEHICLES -ENTOURAGE - SKETCHUP
3 - ADDING TREES PEOPLE ENTOURAGE WITHIN SKETCHUP
4 - ARTFUL RENDER 1
5 - ARTFUL RENDER 2
6 - ARTFUL RENDER FINAL LAYOUTS
MODULE - 11 (NEW RELEASE) - INTERNAL LOUNGE / KITCHEN RENDER ( INTERIOR DESIGN )
1 - ADDING FURNITURE
3 - ADDING PEOPLE ENTOURAGE WITHIN SKETCHUP
4 - TEXTURE MAPPING
5 - HOW TO CREATE CRUDE SHADOWS & LIGHT
6 - ARTFUL RENDER FINAL RENDER & LAYOUT
ZOOM Q & A SESSIONS
- week 1 - Zoom Live - 1.5 hours
- week 2 - Zoom Live - 1.5 hours
- week 3 - Zoom Live - 1.5 hours
- week 4 - Zoom Live - 1.5 hours
- week 5 - Zoom Live - 1.5 hours
- week 6 - Zoom Live - 1.5 hours
FAQ - QUESTIONS
Question #1: What Do I Get When I Join The Course?
So, in short, I'm going to give you everything that you need to create an Artful Render we will be looking at 3 schemes in the time we have together inside the training. At the end of the 6 week period, you will have the ability to create your own Artful Rendering Portfolio Piece. And retain a skillset that you can re-use again and again on future projects.
Question #2: Do I need to know how to model and design 3d?
You do not need to know how to model in 3d, however, if you are familiar with designing in Archicad, Sketchup, Revit, Vectorworks or any of the other 3d design software that exists it will be a bonus. I will supply you with 3 design Models to work on within the masterclass. This process is an add-on to the design process you already may know and understand.
Question #3: how much money will I need to invest?
- All-inclusive ($987) USD = 6 weeks masterclass (Once off Payment Plan)
- 4 Month Payment Plan = 4 Installments of ($285 USD)
- 7-day money-back guarantee from the time we start training, if you feel the course is not for you then I will refund you no questions asked.
- Please contact me for a payment plan
Question #4: how much time will I need to invest?
I would suggest practising the techniques that you learn the same day, 20-30 minutes a day with each new insight will be a game-changer. Obviously, you can work at your own pace. I would suggest every time you watch training to try to implement what you have just learned.
Every Tuesday there will be a live Zoom session of 1.5 hours and this will be recorded and posted in the member area if you missed it.
Question #5: Am I qualified enough to join?
- If you are an architectural student with at least 2- 4 years of experience you should be fine.
- A Technical Architect, with some 3d knowledge will be good
- Professional Architect, with some 3d & planning knowledge.
- Any Modelling skills in any 3d software will help you grasp the process.
- Planning knowledge as a design architect doing basic block layouts.
Question #6: What about the design software and associated costs.
- All the software we are training with has fully functional trial versions.
- Photography(20GB) - US$9.99/mo - Lightroom, Lightroom Classic, Photoshop on desktop and iPad, and 20GB of cloud storage (1TB available).
See plan & pricing details
- Sketchup Pro - 30 day Trial
First Install - Sketchup 2019 Pro when it expires install Sketchup 2020 and then 2021 Pro (90 days)
SKETCHUP PRO - 2019 / 2020 /2021
[ CLICK HERE TO DOWNLOAD NOW! ] - Minimal startup costs, to create powerful results is something unusual in the architectural industry.
Question #7: What about the power of the computer?.
I would suggest to you a core i5 / i7 (2ghz and above with at least 16 MB Ram and an NVIDIA 1050 or equivalent video cards). We are not doing intense computing so even less should be ok. The beauty of working in this environment is that it is light on computing resources.